ZooKeeper、Solr集群搭建
系统环境:
CentOS 7、JDK1.7、solr4、zookeeper3.4.6
zookeeper集群
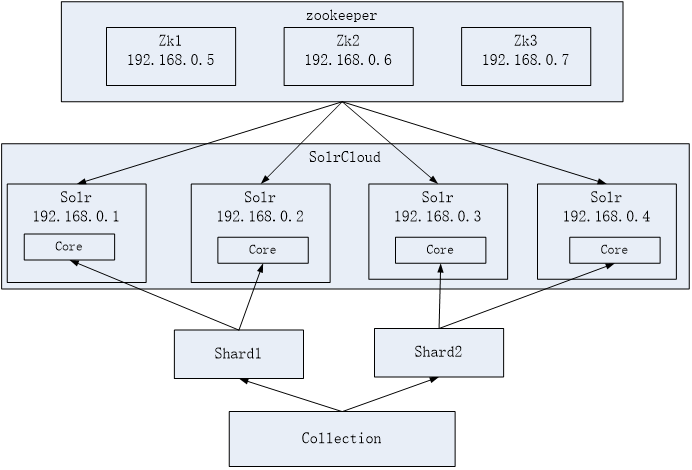
zookeeper半数投票,所以最少3个,与solr集群的关系如图:
集群搭建(伪)
在一台机器上模拟集群:
-
解压zookeeper,tar -zxvf zookeeper-3.4.6.tar.gz将zookeeper-3.4.6拷贝到/usr/local/solrcloud下,复制三份分别并将目录名改为zookeeper1、zookeeper2、zookeeper3
-
进入zookeeper1文件夹,创建data目录。并在data目录中创建一个myid文件内容为“1”(echo 1 >> data/myid)。
-
进入conf文件夹,把zoo_sample.cfg改名为zoo.cfg
-
修改zoo.cfg。
-
修改:
dataDir=/usr/local/solrcloud/zookeeper1/data
clientPort=2181(zookeeper2中为2182、zookeeper3中为2183)
添加:
server.1=192.168.25.154:2881:3881
server.2=192.168.25.154:2882:3882
server.3=192.168.25.154:2883:3883
-
# The number of milliseconds of each tick
tickTime=2000
# The number of ticks that the initial
# synchronization phase can take
initLimit=10
# The number of ticks that can pass between
# sending a request and getting an acknowledgement
syncLimit=5
# the directory where the snapshot is stored.
# do not use /tmp for storage, /tmp here is just
# example sakes.
dataDir=/usr/local/solrcloud/zookeeper1/data
# the port at which the clients will connect
clientPort=2181
# the maximum number of client connections.
# increase this if you need to handle more clients
#maxClientCnxns=60
#
# Be sure to read the maintenance section of the
# administrator guide before turning on autopurge.
#
# http://zookeeper.apache.org/doc/current/zookeeperAdmin.html#sc_maintenance
#
# The number of snapshots to retain in dataDir
#autopurge.snapRetainCount=3
# Purge task interval in hours
# Set to "0" to disable auto purge feature
#autopurge.purgeInterval=1
server.1=192.168.25.154:2881:3881
server.2=192.168.25.154:2882:3882
server.3=192.168.25.154:2883:3883
-
对zookeeper2、3中的设置做第二步至第四步修改。
-
zookeeper2、3
- myid内容为2、3
- dataDir=/usr/local/solrcloud/zookeeper2、3/data
- clientPort=2182、2183
-
-
启动三个zookeeper
/usr/local/solrcloud/zookeeper1/bin/zkServer.sh start
/usr/local/solrcloud/zookeeper2/bin/zkServer.sh start
/usr/local/solrcloud/zookeeper3/bin/zkServer.sh start
- 查看集群状态:
/usr/local/solrcloud/zookeeper1/bin/zkServer.sh status
/usr/local/solrcloud/zookeeper2/bin/zkServer.sh status
/usr/local/solrcloud/zookeeper3/bin/zkServer.sh status
- 开启zookeeper用到的端口,或者直接关闭防火墙。
service iptables stop
Solr集群
集群图示
如,这个solr集群中有3台服务器,每个服务器的solr有两个core。
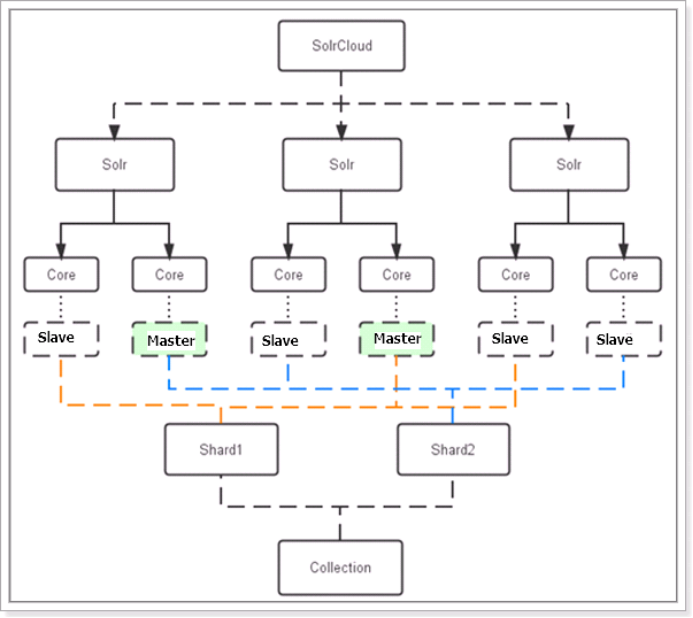
数据索引集合分成2片,由3台服务器各出一个core来组成1个分片,即1个分片=3个core,这三个core数据一致。共6个core两个分片,一个索引集合。在1个数据分片中,有1个core被zookeeper选为主服务节点,其他两个core作为从服务节点。
集群搭建(伪)
在一台机器上模拟集群:
- 先在一台机器上模拟出3个solr实例,和单机版solr搭建一致,以前说过,此处省略。
- solrCloud部署依赖zookeeper,需要先启动每一台zookeeper服务器。
由于zookeeper统一管理solr的配置文件(主要是schema.xml、solrconfig.xml), solrCloud各各节点使用zookeeper管理的配置文件。
-
将上边部署的solr单机的conf拷贝到/home/solr下。
执行下边的这条命令将/home/solr/conf下的配置文件上传到zookeeper。此命令在solr-4.10.3/example/scripts/cloud-scripts/目录下:
./zkcli.sh -zkhost 192.168.25.154:2181,192.168.25.154:2182,192.168.25.154:2183 -cmd upconfig -confdir /usr/local/solrcloud/solrhome1/collection1/conf -confname myconf
- 登陆zookeeper服务器查询配置文件:
cd /usr/local/zookeeper/bin/
./zkCli.sh
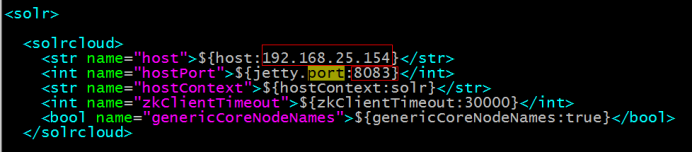
- 修改每个solrhome的solr.xml文件。将host改成虚拟机ip地址,port改成对应的tomcat的端口号。
-
修改每一台solr的tomcat 的 bin目录下catalina.sh文件中加入DzkHost指定zookeeper服务器地址:
shellJAVA_OPTS="-DzkHost=192.168.25.154:2181,192.168.25.154:2182,192.168.25.154:2183" #(可以使用vim的查找功能查找到JAVA_OPTS的定义的位置,然后添加) -
启动每一台solr的tomcat服务,访问任意一台solr,左侧菜单会出现
Cloud选项:
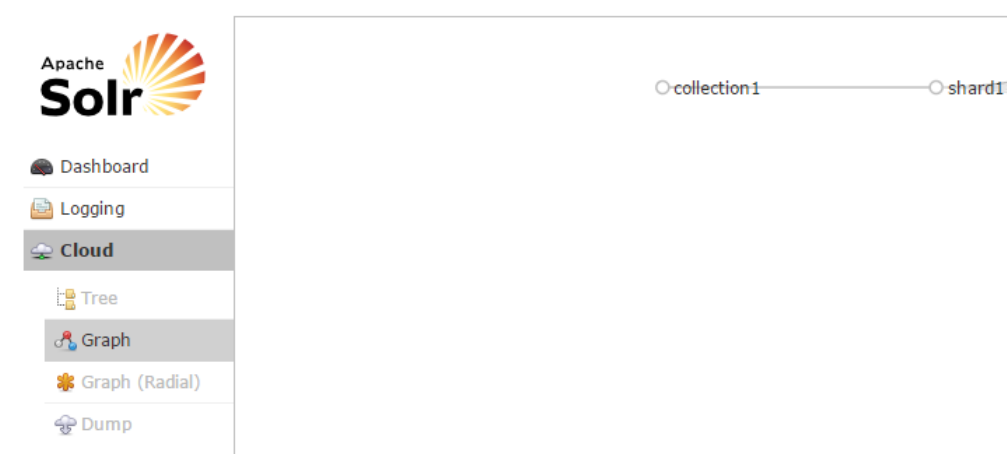
可在Cloud选项查看集群状态。
分片
如果集群中有四个solr节点创建新集群collection2,将集群分为两片,每片两个副本。
http://yourIpAndProt/solr/admin/collections?action=CREATE&name=collection2&numShards=2&replicationFactor=2
删除
http://yourIpAndPort/solr/admin/collections?action=DELETE&name=collection1
执行后原来的collection1删除
更多命令请百度。